How to Cut Men’s Hair at Home with Clippers: A Simple Step-by-Step Guide
Learning how to cut men’s hair at home with clippers can save money, save time, and keep you looking sharp between barber visits. The key is not rushing. A good clipper cut is mostly about clean sections, the right guard length, and smooth blending.
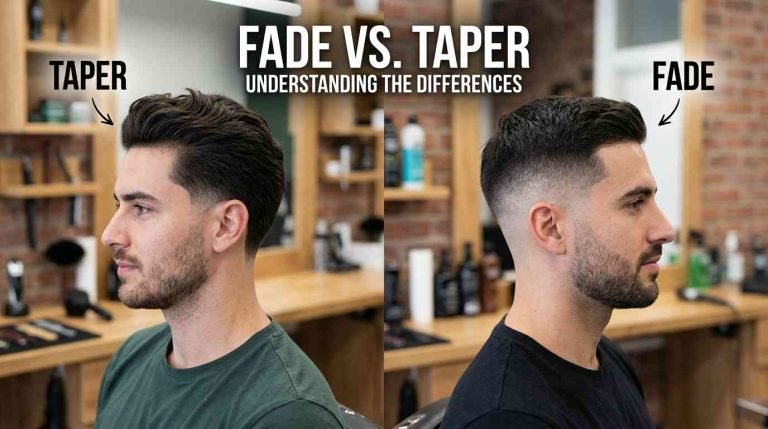
This guide walks you through a simple, reliable method that works for most classic men’s haircuts, especially short styles and basic tapers.
What you need before you start?
A home haircut goes much better when you have the right tools and setup.
Essential tools
- Hair clippers (corded or fully charged cordless)
- Guard attachments (at least #1 to #8)
- Comb (a regular comb plus a clipper comb if you have one)
- Hand mirror (to check the back)
- Hair clips (optional but helpful for longer top hair)
- Scissors (optional, for tidying the top)
- Cape or towel
- Good lighting and a place that’s easy to clean
Best place to cut hair
Cut in a bathroom or anywhere with:
- Bright overhead light (plus extra light if possible)
- A mirror in front and a hand mirror for the back
- Easy cleanup (tile floor is ideal)
Clipper guard sizes made simple
Guard numbers can feel confusing at first. This quick chart helps you pick lengths with confidence.
Common guard lengths (quick table)
| Guard | Approx. length | Best for |
|---|---|---|
| #0.5 | 1.5 mm | Very tight blending, near-skin look |
| #1 | 3 mm | Tight sides, clean summer cut |
| #2 | 6 mm | Short sides, safe beginner length |
| #3 | 10 mm | Short but not harsh |
| #4 | 13 mm | Medium-short sides, easy to blend |
| #6 | 19 mm | Longer sides, classic clipper cut |
| #8 | 25 mm | Longer “crew” style length |
Choose a simple haircut style for home
If you’re cutting your own hair (or cutting for someone else at home), start with a style that forgives small mistakes.
Beginner-friendly options
- One-length buzz cut (same guard everywhere)
- Crew cut (short sides, slightly longer top)
- Short back and sides with a simple taper (not a high skin fade)
What to avoid at first?
- High skin fades (they show every uneven spot)
- Complex scissor work on long hair
- Big length changes without a plan
Prep: how to get the hair and head ready?
Good prep makes the cut cleaner and more even.
Wash, dry, and detangle
- Wash hair or at least rinse it to remove product.
- Dry hair fully before using clippers (most clipper cuts are best on dry hair).
- Comb the hair in its normal direction so you can see the natural shape.
Decide your “top” and “sides”
Before you cut, decide:
- How short you want the sides and back
- How long you want the top
- Whether you want a taper at the neckline and sideburns
Step-by-step: how to cut men’s hair at home with clippers?
This is a practical order that helps you stay neat and avoid chasing mistakes.
Start longer than you think
If you’re unsure, start with a longer guard (like #4 or #3). You can always go shorter.
Step 1 — Set your base length on the sides and back
Pick your starting guard for the sides (example: #3).
How to clip the sides?
- Begin at the lower side near the ear.
- Move the clippers upward against hair growth.
- Use smooth strokes.
- Do not go too high yet—stop around where the head starts to curve (the ridge area).
How to clip the back?
- Use the hand mirror to check your path.
- Start low and move upward.
- Keep the clipper flat to the head for an even cut.
Step 2 — Create a simple blend (the easy way)
Blending is what makes a home clipper cut look professional.
Use the “step-down” method
- If you used #3 on the sides, use #2 just on the lower part of the sides and back.
- Then use #1 even lower (near the bottom edges only), if you want it tighter.
Use the “flick out” motion
As you reach the area where you want the blend to stop, slightly flick the clippers outward. This prevents a hard line.
Step 3 — Cut the top (two simple options)
How you cut the top depends on the style you want and how long the hair is.
Option A: Cut the top with a longer guard
- Use #6 or #8 on top for a short, even look.
- Go slowly and clip in more than one direction (front-to-back, then side-to-side) to catch uneven spots.
Option B: Keep the top longer and only tidy it
- Clip the sides and back first.
- Comb the top and only trim small amounts with scissors.
- If you’re new, trim less than you think you need.
Step 4 — Blend the top into the sides
This is where many home cuts look “shelf-like” if you skip it.
A simple blending approach
- If your sides are #3 and your top is longer, use a #4 or #5 around the upper sides to soften the transition.
- Work in a narrow band between the sides and the top.
- Use the flick-out motion to avoid a visible line.
Step 5 — Clean around the ears
This small detail makes a big difference.
How to do it safely?
- Use a longer guard first if you’re nervous.
- Gently pull the ear down and trim carefully around it.
- Slow down and check symmetry.
Step 6 — Tidy the neckline and sideburns
You can keep it natural or make it crisp, depending on what you like.
Neckline options
- Natural neckline: looks softer and grows out better
- Rounded or squared neckline: looks sharper but needs more upkeep
Sideburn tip
Make both sideburns match in height before you detail them.
How to do a basic taper at home (easy and clean)?
A taper is a safe way to level up your haircut without doing a full fade.
Where a taper should be?
- Around the sideburns (temple area)
- Around the neckline (nape)
Simple taper steps
1) Start with your side length
Example: #3 on sides.
2) Go one guard shorter at the bottom
Example: #2 only on the lower inch or so near the ears and neckline.
3) Go one guard shorter again on the very bottom edge
Example: #1 only on the very bottom edge.
4) Lightly blend
Use a gentle flick-out motion to soften any lines.
Common mistakes (and how to fix them)
Small issues happen. Most are easy to correct if you stay calm.
Quick fixes table
| Problem | Why it happens | Simple fix |
|---|---|---|
| A hard line on the sides | You stopped clippers abruptly | Use one guard longer and flick out over the line |
| Patchy spots | Missed areas due to direction | Clip again in different directions with same guard |
| Too short too fast | Started with a low guard | Start longer next time; even it out carefully |
| Uneven sideburns | Didn’t check both sides early | Set one sideburn, then match the other |
| Neckline looks crooked | Mirror angles or rushing | Use a hand mirror, mark a center point, trim slowly |
Tips for a cleaner, more professional result
Small habits make your cut look much better.
Go slow and check often
Stop every few minutes and check:
- Both sides in the mirror
- The blend line
- The back under good light
Keep the clippers maintained
- Clean out hair between passes
- Oil the blades if your clippers require it
- Use sharp tools (dull blades pull hair and cut unevenly)
Do not chase perfection
A home cut can look great without being “barber-perfect.” If you keep adjusting one small area, you can accidentally create a dip or bald spot.
How often should you cut men’s hair at home with clippers?
Most short clipper cuts look best on a schedule.
Good timing for most styles
- Buzz cuts: every 1–2 weeks
- Short back and sides: every 2–3 weeks
- Tapers: every 2–4 weeks depending on how sharp you like the edges
Conclusion
Once you learn the basics, how to cut men’s hair at home with clippers becomes a simple routine: choose a safe guard length, set the sides and back, blend in steps, then clean the edges. Start longer than you think, use the flick-out motion for blending, and take your time checking symmetry.
With a little practice, you can get clean, reliable results that look neat and intentional—not like a rushed DIY cut.